Corn Paneer Toast in English
वाढणी: ४ ते ५ ब्रेड
साहित्य:
३/४ कप मक्याचे दाणे (उकडलेले)
१/४ कप पनीर (छोटे तुकडे)
४ व्हाईट ब्रेड स्लाईस
१ टिस्पून बटर
१/४ कप + २ टेस्पून दुध
१ हिरवी मिरची बारीक चिरून
१/२ टिस्पून कॉर्न फ्लोअर
आवडीनुसार किसलेले चिज
चवीनुसार मिरपूड आणि मिठ
कृती:
१) पॅन गरम करून त्यात बटर घालावे. बटर वितळले कि त्यात हिरवी मिरची घालावी. उकडलेले मक्याचे दाणे थोडावेळ परतून घ्यावे.
२) नंतर परतलेले मक्याचे दाणे बाजूला काढून ठेवावे. नंतर त्याच पॅनमध्ये पाव कप दुध घालून ढवळावे. गॅस मंद करून ठेवावा. २ टेस्पून गार दुधात थोडे कॉर्न फ्लोअर घालून मिक्स करावे व गरम दुधात घालावे. मध्यम आचेवर उकळू द्यावे, हळूहळू घट्टसर सॉस तयार होईल. सॉस घट्ट होताना ढवळत राहावे, गुठळी राहू देवू नये. यात परतलेले मक्याचे दाणे घालावेत व पनीर घालावे, निट मिक्स करावेत. गॅस बंद करून या मिश्रणात थोडे मिठ घालावे.
३) ओव्हन ३५० F वर प्रिहीट करावे.
४) ब्रेड स्लाईसवर मक्याचे तयार मिश्रण लावावे. वरून आवडीनुसार चिज घालावे. ५ मिनीटे बेक करावे. ब्रेडवरील चिज वितळले आणि ब्रेड जरा क्रिस्पी झाला कि बाहेर काढावे. थोडे मिठ-मिरपूड भुरभूरवावी. टॉमेटो सॉसबरोबर गरमागरम सर्व्ह करावे. हे टोस्ट हिरव्या चटणीबरोबरही खुप छान लागतो.
Labels:
Corn Toast, Corn Recipes, Corn Snacks
Thursday, January 29, 2009
Corn and Paneer Toast
Corn and Paneer Toast in Marathi
Servings: 4 to 5 pieces
Ingredients:
3/4 cup boiled Corn
1/4 cup Paneer, small cubes
4 slices of White bread
1 tsp Butter
1/4 cup + 2 tbsp Milk
1 Green Chili, finely chopped
1/2 tsp Corn Flour
Grated Cheese
Salt and Pepper to taste
Method:
1) Heat butter in a medium saucepan. Once butter is melted, add Green Chili and Corn. Stir for about 2 minutes over medium heat.
2) Transfer sauteed Corns to other bowl. In that same pan, add 1/4 cup milk and simmer over medium low heat. Mix 1/2 tsp Corn Flour in 2 tbsp milk, add it to hot milk and stir continuously. Slowly, it will become thick sauce. Keep stirring, don't let it become lumpy. Let the flour cook for about a minute. Add Corns and Paneer Cubes, mix well. Turn off the heat, sprinkle little salt and mix.
3) Preheat oven to 350 F.
4) Spread Corn mixture on each bread slice evenly. Top with some cheese. Bake for 5 minutes or until cheese melts and bread slice become slightly crispy. Sprinkle little Pepper powder. Serve hot with Tomato Ketchup.
Labels:
Corn toast, cheese and corn toast
Labels:
Appetizers Recipes,
Corn Recipes,
English,
Snack Recipes
Wednesday, January 28, 2009
Lyndon Wade Photography
Tuesday, January 27, 2009
पाइनॅपल रायता - Pineapple Raita
Pineapple Raita in English
वाढणी : २ जणांसाठी
साहित्य:
३/४ कप अननस लहान फोडी
१ कप दही
१/८ टिस्पून जिरेपूड
चवीपुरते मिठ
१ टेस्पून साखर
१ लहान हिरवी मिरची (ऐच्छिक)
१ टिस्पून कोथिंबीर
१ चेरी सजावटीसाठी (ऐच्छिक)
४ ते ५ अननसाचे लहान तुकडे सजावटीसाठी
कृती:
१) दही चांगले फेटून घ्या. त्यात साखर आणि थोडे मिठ घालावे. जर थोडा तिखटपणा हवा असेल तरच मिरची घालावी.
२) फेटलेल्या दह्यात अननसाच्या फोडी घालाव्यात. चव पाहून साखर मिठ आवडीनुसार वाढवावे, मिक्स करावे. सर्व्हींग बोलमध्ये घालून त्यावर जिरेपूड भुरभूरावी. नंतर अननसाच्या फोडी, कोथिंबीर आणि चेरीने सजवावे. थोडावेळ थंड करून सर्व्ह करावे.
टीप:
१) जर फक्त गोड रायते हवे असेल तर हिरवी मिरची वगळावी.
२) काही जणांना गोड रायते आवडते. त्यांनी आवडीनुसार साखर वाढवावी.
३) किंचीत मिरपूड घातल्याने छान स्वाद येतो. फक्त ती सर्व्ह करण्याआधी दह्यात मिसळू नये, त्यामुळे दह्याचा रंग बदलेल. म्हणून जिरपूडसारखीच वरून भुरभूरावी.
Pineapple Raita
Pineapple Raita in Marathi
Ingredients:
3/4 cup Pineapple Tidbits
1 cup Yogurt
1/8 tsp Cumin powder
salt to taste
1 tsp Sugar
1 tsp Cilantro
1 Green chili (Optional)
1 Cherry for Garnishing (Optional)
4 to 5 Pineapple Tidbits for garnishing
Method:
1) Whisk Yogurt nicely. Add sugar and little salt. Add chopped green chili If you want little heat in taste.
2) Add Pineapple tidbits into whisked yogurt and mix well. Taste raita and add sugar and salt if needed. Transfer Raita to a serving bowl. sprinkle little Cumin Powder, garnish with 3-4 Pineapple tidbits, Cilantro and Cherry. Refrigerate for atleast an hour. serve chilled.
Tips:
1) Skip chili in case you want plain and sweet Raita
2) Add sugar as per taste.
3) Sprinkle little pepper powder for nice flavor. Do not mix before serving, it will change the color of Raita.
Monday, January 26, 2009
Carlos De Spinola Photograhy
Carlos de Spinola Photography
Technorati Tags: Carlos De Spinola, Photography, Photos, Images, Art, Wildlife
Labels:
Art,
Carlos De Spinola,
Images,
photography,
photos,
Wildlife
Christophe Huet - Professional Re-Touching
Labels:
Art,
Christophe Huet,
photography,
professional,
Re-Touching
Thursday, January 22, 2009
Philippe Salomon Photography
Gerhilde Skoberne | Fotografie
Technorati Tags: Gerhilde Skoberne, Photography, Models, Photos, Images
Labels:
Gerhilde Skoberne,
Images,
Models,
photography,
photos
ग्वाकामोले - Guacamole
Guacamole in English
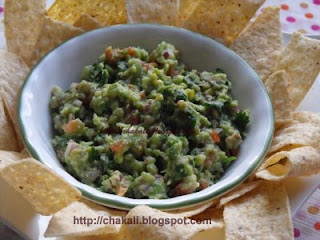
आवोकाडो हे खुप पौष्टीक आणि चविष्ट असे फळ आहे. भारतात आवोकाडो पाहायला मिळत नाही पण अमेरीकेतील बाजारात तरी अगदी सहज available असतो. कॉर्न चिप्सबरोबर आवोकाडो डीप किंवा ग्वाकामोले संध्याकाळच्या खाण्यासाठी चांगला आणि healthy पर्याय आहे. त्याचीच ही झटपट कृती.
आवोकाडोच्या औषधी गुणधर्मांविषयी वाचण्यासाठी इथे क्लिक करा - Avocado Health Benefits.
वाढणी: २ जणांसाठी
साहित्य:
१ पिकलेला आवोकाडो (टीप १)
१/४ कप लाल कांदा, एकदम बारीक चिरलेला
१/४ कप लालबुंद टोमॅटो, बारीक चिरून
१/४ कप कोथिंबीर, बारीक चिरून
२ टिस्पून लिंबू रस
१ लहान हिरवी मिरची, बारीक चिरून
किंचीत मिठ
१/८ टिस्पून मिरपूड
कृती:
१) आवोकाडोमधील गर काढून घ्यावा. एका बोलमध्ये आवोकाडोमधील गर काट्याने (Fork) मॅश करून घ्यावा. पूर्ण मॅश करू नये, किंचीत गुठळ्या राहू द्याव्यात.
२) मॅश केलेल्या आवोकाडोमध्ये लिंबाचा रस, चिरलेला कांदा, टोमॅटो, कोथिंबीर, आणि मिरची घालून मिक्स करावे. थोडे मिठ आणि मिरपूड घालावी.
ग्वाकामोले किंवा आवोकाडो डिप, टॉर्टीया चिप्सबरोबर खुपच छान लागतो तसेच मेक्सिकन राईस आणि इतर मेक्सिकन डिशेस बरोबर मस्त जमून जातो.
टीप:
१) कच्च्या आवोकाडोचे साल गर्द हिरवे असते, तर पिकलेल्या आवोकाडोचे साल काळपट हिरवे झालेले असते. पण आवोकाडो घेताना खुप जास्त पिकलेलाही घेऊ नये, निट तपासून घ्यावा. सर्व बाजूंनी firm असला पाहिजे. कधी कधी जास्त पिकलेला आवोकाडो आतून खराब निघतो, तसेच चवीलाही चांगला लागत नाही.
२) ग्वाकामोले जर थोडा थंड करायचा असेल तर ग्वाकामोले एका काचेच्या बोलमध्ये ठेवून त्यावर प्लास्टिक रॅप करून तासभर फ्रिजमध्ये ठेवावे म्हणजे काळपट पडणार नाही. तासाभराने थंड ग्वाकामोले, टॉर्टीया चिप्सबरोबर सर्व्ह करावे.
३) कांदा टोमॅटोचे प्रमाण आवडीनुसार कमीजास्त करावे.
४) खायच्या आधी टॉर्टीया चिप्स ओव्हनमध्ये ५ मिनीटे बेक करावे, गरम चिप्समुळे चव खुप छान लागते आणि चिप्स जास्त कुरकूरीतही लागतात.
Labels:
Diet Recipes,
F - J,
Mexican,
Oil-Free,
Quick n Easy,
Snacks
Guacamole
Guacamole in Marathi
Avocado is a nutritious Fruit which has many health benefits. Learn More about Health Benefits of Avocado
Ingredients:
1 Ripe Avocado
1/4 cup Red Onion, finely chopped
1/4 cup Tomato, finely chopped
1/4 cup Cilantro, finely chopped
1 tbsp Lemon Juice
1 small Green chili, finely chopped
Salt to taste
1/8 tsp Black pepper
Method:
1) Halve and deseed the Avocado. Scoop out the fleshy portion into a bowl. Mash with fork, but keep some small lumps for nice texture.
2) Add the remaining ingredients and mix well.
Serve with Tortilla chips. It goes great as side dish with any Mexican dish.
Note:
1) Unripe Avocado has dark green skin and ripe one has dull 'brownish green' colored skin. Buy ripe avocado to make guacamole. Do not buy overdone Avocado. It might be spoiled from inside. You will feel the difference in the texture of overdone and perfectly done avocado by touching them.
2) To served chilled Guacamole, put the guacamole into a bowl, plastic wrap to cover it and refrigerate for an hour.
3) Adjust quantity of Onion-Tomato according to your taste.
4) Bake Tortilla chips for 4 to 5 minutes before eating. Baking makes tortilla chips more appetizing and more crispy.
Labels:
Guacamole, Avocado Dip, avocado snack, healthy avocado recipe
Tuesday, January 20, 2009
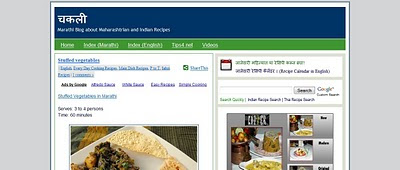
How to check recent recipes?
How to check recent recipes on Chakali blog?
You are on Chakali's home page - http://chakali.blogspot.com
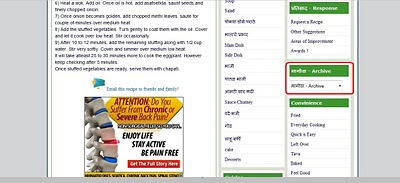
Scroll down upto the middle of the page.
On the right hand side, you will see different labels in Green color.
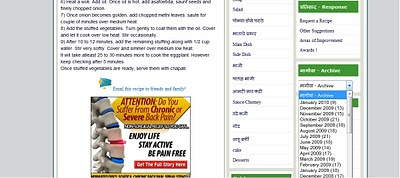
To see Recent recipes or month-wise recipes, see the label 'मागोवा - Archive' at the right most column, below the label 'प्रतिसाद - Response' and above 'convenience'
Click on the drop-down menu and select month to see recipes posted in that particular month.
For Recent recipes, select the most recent month from the drop down menu.
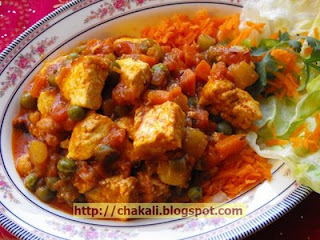
वेज पनीर माखनवाला - Paneer Makhanwala
Veg Paneer Makhanwala in English
वाढणी: ३ जणांसाठी
खाली दिलेली कृती ज्यांना खुप मसालेदार पंजाबी भाजी आवडत नाही त्यांच्यासाठी स्पेशल आहे. चवीला खुप छान आणि सौम्य लागते.
साहित्य:
१/२ कप पनीरचे तुकडे
१/४ कप फरसबीचे तुकडे (१/२ इंच)
१/४ कप गाजर (छोटे चौकोनी तुकडे)
१/४ कप बटाटा (सोलून छोटे तुकडे)
१/४ कप फ्लॉवरचे तुकडे
१/२ कप कांदा (छोटे तुकडे)
३ टेस्पून मटार
१ कप टोमॅटोचे तुकडे (सोललेला)
१ टेस्पून टोमॅटो पेस्ट
१/२ टेस्पून जिरे
१/२ टेस्पून लाल तिखट
१/२ टिस्पून गरम मसाला
१ तमालपत्र
दिड टेस्पून दुध
दिड टेस्पून बटर
२ टेस्पून तूप
चवीपुरते मिठ
कृती:
१) २ कप पाण्यात फरसबीचे तुकडे, गाजर, बटाटा, फ्लॉवरचे तुकडे आणि मटार उकळवत ठेवावे. या पाण्यात १ तमालपत्र घालावे. भाज्या निट शिजू द्याव्यात. भाज्या शिजल्या कि उरलेले पाणी ठेवून द्यावे. तमालपत्र काढून टाकावे.
२) २ टोमॅटो पाण्यात साल सुटेस्तोवर उकळवावे. साले काढून टोमॅटोचे बारीक तुकडे करावे.
३) नॉनस्टीक पॅनमध्ये तूप गरम करून त्यात जिरे घालावे व कांदा परतावा. कांदा परतला कि १/२ टिस्पून गरम मसाला घालावा. कांदा निट शिजू द्यावा.
४) नंतर टोमॅटोचे तुकडे घालावे. तूपाचा तवंग येईस्तोवर शिजू द्यावे.
५) नंतर उकळलेल्या भाज्या घालाव्यात, भाज्या उकळून उरलेले पाणी, टोमॅटोपेस्ट घालावी, मिठ आणि तिखट घालावे. ढवळावे.
६) गॅस मंद करून दुध, बटर, पनीर घालून हळूवार ढवळावे.४ ते ५ मिनीटे मंद आचेवरच झाकून शिजू द्यावे.
गरमा-गरम भाजी नान, रोटी किंवा भाताबरोबर सर्व्ह करावी.
Labels:
Paneer Makhanwala, Vegetable Makhanwala, Punjabi Recipes
Veg Paneer Makhanwala
Veg Paneer Makhanwala in Marathi
serves: 3 persons
Ingredients:
½ cup Paneer Pieces
¼ cup Green beans (1/2 inch pcs)
¼ cup Carrot, small cubes
¼ cup potato, peeled and cubed
¼ cup Cauliflower pieces
½ cup onion cubes
3 tbsp Green peas
1 cup Tomato cubes (peeled)
1 Tbsp Tomato Paste
½ tbsp Cumin seeds
½ tbsp Red Chili Powder
½ tsp Garam masala
1 bay leaf
1½ tbsp Milk
1½ tbsp Butter
2 tbsp Ghee
Salt to taste
Method:
1) Heat 2 cup water in a saucepan. Add Green beans, Carrot, Potato, peas and cauliflower. Put a Bay leaf in the water to give nice flavor to vegetables. Stir and let the vegetables cook until tender. Reserve remained water for further use. Remove the bay leaf.
2) Blanch two tomatoes, remove skin and make small pieces of tomatoes.
3) Heat a nonstick pan, add Ghee and let it melt. Add Cumin seeds and onion, saute until onion becomes translucent. Add Garam Masala and give a nice stir.
4) Then add blanched Tomato pieces. Let it cook until the mixture leaves butter.
5) Add cooked vegetables, reserved water, tomato paste, salt and Chili Powder. Stir nicely.
6) Turn heat on medium low. Add Milk, butter, Paneer pieces and mix very gently. Cover pan with lid and let it cook for 5 minutes.
Serve hot with Chapatti, Naan, or Roti.
Labels:
Paneer Makhanwala, paneer Makhanvala recipe, North Indian Recipe, Punjabi curry
Trevor Brady Photography and Art Direction
Up, Up & Away. on the Behance Network
Technorati Tags: Trevor Brady, Photography, Art Direction, Behance, Models
Labels:
Art Direction,
Behance,
Models,
photography,
Trevor Brady
Monday, January 19, 2009
Nick Saglimbeni Photography
Decayed Sunset Photography - Jano De Cesare
Decayed sunset on Flickr - Photo Sharing!
Technorati Tags: Jano De Cesare, Decayed, Sunset, Photography
Escapista Photography
Chase Jarvis Photography
Thursday, January 15, 2009
Mikel Uribetxeberria Photography
animalia : Mikel Uribetxeberria
Technorati Tags: Mikel Uribetxeberria, Photography, Photos, Animals, Wild
Labels:
Animals,
Mikel Uribetxeberria,
photography,
photos,
Wild
काळ्या वाटाण्याची आमटी - Kala Vatana Amti
Kalya Vatanyachi Amati in English
साहित्य:
एक कप काळे वाटाणे
कांदा-नारळ पेस्टसाठी: १/४ कप खवलेला ओला नारळ, १/२ कप कांदा, उभा चिरून, १ टेस्पून तेल
फोडणीसाठी
२ टेस्पून तेल, १/४ टिस्पून मोहोरी, १/२ टिस्पून जिरे, १/८ टिस्पून हिंग, १/४ टिस्पून हळद, १ टिस्पून लाल तिखट, ४ कढीपत्ता पाने
१/२ कप बारीक चिरलेला कांदा
१ टिस्पून धणेपूड
१ टिस्पून जिरेपूड
३ आमसुलं
१ टिस्पून गूळ
१ टेस्पून काळा मसाला
चवीपुरते मिठ
कृती:
१) काळे वाटाणे ८ ते १० तास भिजवावेत. नंतर पाणी काढून टाकावे आणि मोड येण्यासाठी सुती कापडात गच्चं बांधून ठेवावेत (कमीतकमी १० ते १२ तास).
२) पॅनमध्ये १ टेस्पून तेल गरम करावे. कांदा नीट परतून घ्यावा. कांदा व्यवस्थित शिजला पाहिजे, कच्चा राहू देऊ नये. नंतर नारळ घालून परतून घ्यावे. (टीप) हे मिश्रण थोडे गार झाले कि मिक्सरमध्ये बारीक पेस्ट करून घ्यावी.
३) लहान कूकरमध्ये २ टेस्पून तेल गरम करावे. त्यात मोहोरी, जिरे, हिंग, हळद, आणि कढीपत्ता घालून फोडणी करावी. त्यात भिजवून मोड आलेले वाटाणे घालून एक मिनीटभर परतावे. नंतर त्यात धणेजिरेपूड घालून परतावे. गरजेपुरते पाणी घालावे (साधारण १ ते दिड कप). चवीपुरते मिठ, काळा मसाला आणि आमसुलं घालावीत. मिक्स करून कूकर बंद करावा आणि ५ ते ७ शिट्टया किंवा वाटाणे शिजेपर्यंत शिट्ट्या कराव्यात.
४) कूकर थंड झाला कि उघडावा त्यात कांदा-नारळ पेस्ट घालून उकळी काढावी. आता गुळ घालावा. गरजेनुसार पाणी वाढवावे. चव पाहून तिखट आणि मिठ अड्जस्ट करावे.
हि वाटाण्याची आमटी गरमागरम भाताबरोबर सर्व्ह करावी.
टीप:
१) जर सुके खोबरे वापरायचा असेल तर कांदा परतायच्या आधी सुका नारळ परतावा नंतर कांदा घालावा.
२) काही जणांना कडधान्याची आमटी फोडणीला टाकून प्रेशर कूक करायला आवडत नाही. अशावेळी, आधी प्रेशरकूकरमध्ये फक्त वाटाणे मिठ घालून शिजवून घ्यावेत. आणि नेहमीच्या फोडणीसारखे, कढईत फोडणीस टाकावेत.
३) ताजा खोवलेला नारळ वापरत असाल तर आवडीनुसार जास्त घातला तरी चालेल.
४) सुके खोबरे तेलात चांगले भाजून घेतल्याने त्याचा खमंगपणा या आमटीला छान लागतो. मी ओला नारळ व सुके खोबरे वापरून दोन्ही पद्धतीने आमटी बनवली. ओल्या नारळापेक्षा सुके खोबरे या आमटीत जास्त चांगले लागते, फक्त खोबरे तेलात छान खमंग भाजले गेले पाहिले.
Labels:
Kala Vatana Amati, Vatanyachi Amti, Maharashtrian Amti, Kalya vatanyache sambhar
Labels:
Amati/Saar/Kadhi,
Every Day Cooking,
K - O,
Maharashtrian
Wednesday, January 14, 2009
Black Peas Curry
Kalya Vatanyachi Amti in Marathi
Ingredients:
1 cup dried Black peas (Kala Vatana)
Onion-Coconut Paste: 1/4 cup fresh coconut, (scraped), 1/2 cup Onion, sliced lengthwise, 1 tbsp Oil
For Tempering
2 tbsp Oil, 1/4 tsp Mustard seeds, 1/2 tsp Cumin Seeds, 1/8 tsp Asafoetida, 1/4 tsp Turmeric Powder, 1 tsp Red chili Powder, 4 Curry leaves
1/2 cup Onion, finely chopped
1 tsp Coriander Powder
1 tsp Cumin Powder
3 Kokum
1 tsp Jaggery
1 tbsp Goda Masala
salt to taste
Method:
1) Soak dry Vatana in warm water for 8 to 10 hours. They get swollen after 8 hours. Drain and remove water completely. Transfer drained Peas to a clean cotton cloth place in the center. Hold all the edges together, twist and tie tightly. Place it to warm place for atleast 10 to 12 hours for sprouting.
2) Heat a nonstick pan. Add 1 tbsp Oil. Add Onion (thinly sliced), saute till translucent. Add scraped Coconut (Note). saute for a minute and turn off heat. Let this mixture cool down and grind to fine paste.
3) In a small pressure cooker (Note), heat 2 tbsp oil. temper with Mustard Seeds, Cumin Seeds, Asafoetida powder, Turmeric Powder, red chili powder and Curry leaves. Now add sprouted black Peas and saute for a minute. Add cumin and coriander powder, add enough water to pressure cook (approx 1 to 1 1/2 cup). Add salt to taste, Goda Masala, and Kokum. Give a nice stir and close pressure cooker with lid. Pressure cook peas curry to 5-7 whistles or till peas get cooked nice and tender.
4) Let the pressure cooker cools down. Open the lid. Turn the heat on. Once the curry starts boiling, add coconut-onion paste, little jaggery. Stir nicely. Also add little water, if needed, to adjust the consistency. Taste the curry and add salt or chili powder to your taste.
Serve Black peas curry with steamy white rice.
Note:
1) If you are using grated 'dry' coconut, saute coconut first in Oil till brown and then saute Onion.
2) Some people don't like to pressure cook curry, after tempering and adding spices. In that case, pressure cook only soaked peas with little salt and water until soft and tender. And then in a deep pan proceed with tempering (step 3), add cooked Peas, coconut-onion paste and other dry ingredients. Boil for few minutes to get nice aromatic flavor.
Labels:
Kala Vatana Amati, Vatanyachi Amti, Maharashtrian Amti, Kalya vatanyache sambhar
Labels:
A to E,
Curry / Kadhi Recipes,
English,
Maharashtrian Recipes
Tuesday, January 13, 2009
Rinze van Brug - New York Snow Photography
New York Snow 2008 on the Behance Network
Technorati Tags: Rinze van Brug, New York, Photography, Snow
At Last, a real Mac vs PC Advert
Technorati Tags: Advert, Mac vs PC, At last, Graphic Design Forum, Apple
Labels:
Advert,
apple,
At last,
graphic design forum,
Mac vs PC
तिळाच्या वडया - Tilachya Vadya
Tilachya Vadya in English
साधारण २० वड्या
साहित्य:
१/२ कप भाजलेल्या शेंगदाण्याचा कूट
१/२ कप किसून भाजलेले सुके खोबरे
१/२ कप तिळ
पाऊण कप किसलेला गूळ
१/२ टेस्पून तूप (साधारण २ टिस्पून)
१/२ टिस्पून वेलचीपूड
सुकामेवा (ऐच्छिक) (काजू बदामचे तुकडे)
कृती:
१) तिळ मध्यम आचेवर कोरडेच भाजून घ्यावेत. आणि मिक्सरमध्ये अगदी काही सेकंद फिरवावे. तिळाची पूड करू नये, तिळ अर्धवट मोडले गेले पाहिजेत.
२) वड्या करण्यापुर्वी दोन स्टीलच्या ताटांना तूपाचा हात लावून ठेवावा. पातेल्यात तूप गरम करावे. त्यात किसलेला गूळ घालावा. गूळ वितळला कि गॅस बंद करावा. लगेच त्यात शेंगदाण्याचा कूट, भाजलेले सुके खोबरे, आणि भाजलेले तिळ घालावेत आणि भराभर मिक्स करावे. लगेच वेलचीपूड आणि सुकामेवा घालावा. मिक्स करून हे दाटसर मिश्रण तूप लावलेल्या ताटात घालून थापावे. मिश्रण गरम असल्याने थापण्यासाठी एखाद्या वाटीच्या बुडाला तूप लावून त्याने थापावे.
३) मिश्रण गार झाल्यावर वड्या पाडाव्यात.
Labels:
Sesame Cakes, Sesame vadi, Tilachya Vadya
Sesame and jaggery Cakes
Sesame Vadi in Marathi
Approx 20 Vadis
Ingredients:
1/2 cup Roasted Peanuts, coarse Powder
1/2 cup grated and roasted dry Coconut
1/2 cup Sesame seeds
3/4 cup grated Jaggery
1/2 tbsp Ghee (approx 2 tsp)
1/2 tsp Cardamom Powder
Dry fruits (Almond, Cashew nuts wedges)
Method:
1) Dry roast Sesame seeds over medium low heat till color changes to light brown. Transfer roasted Sesame seeds to another plate and let it cool down. Put them into blender and blend for 3 to 4 seconds we don't want to crush them a little bit.
2) Before starting to make Sesame Vadi, grease 2 stainless steel plate with little Ghee. Now heat a nonstick pan. Add grated Jaggery and let it melt. Once it is completely melted, add Peanuts Powder, roasted Coconut, and roasted Sesame seeds. Mix all well. Add Cardamom Powder and dry fruits. Mix all well. You need to do it little fast because we don't want the mixture to become dry. Mixture should be very thick.
3) Pour this mixture over greased plates and spread evenly and make a 1/2 inch thick layer.
Once mixture cools down, cut into 2 X 2 inch pieces.
Labels:
Sesame Vadi, Tilachya Vadya
Monday, January 12, 2009
Andreas Stavrinides Photography
FUGAZI 2007 on the Behance Network
Technorati Tags: Andreas Stavrinides, Photography, Photos, Images, Fashion
Labels:
Andreas Stavrinides,
Fashion,
Images,
photography,
photos
Richard Thompson - AUTOMOTIVE PHOTOGRAPHY
PHOTO: automotive on the Behance Network
Technorati Tags: Richard Thompson, Automotive, Photography, Cars, Roads
Labels:
Automotive,
Cars,
photography,
Richard Thompson,
Roads
Andrew Brooks Photography
Raymond Meier Photographer
Labels:
Jungle,
Photographer,
photography,
Plants,
Raymond Meier
Sunday, January 11, 2009
Photography by Dustin Fenstermacher
A somewhat quirky online portfolio by American photographer, Dustin Fenstermacher.
About the photographer.
Technorati Tags: Dustin Fenstermacher, photographer, American, Philidelphia, quirky, colourful, images, Superman, food, diner, online, portfolio, gallery, camera
Labels:
American,
Camera,
colourful,
diner,
Dustin Fenstermacher,
food,
Gallery,
Images,
online,
Philidelphia,
Photographer,
Portfolio,
quirky,
Superman
Saturday, January 10, 2009
JeanYves Lemoigne Photography
Thursday, January 8, 2009
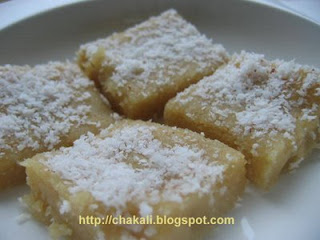
इडली रवा खांडवी - Idli Rava Khandavi
Idli Rava Khandvi in English
साहित्य:
१/२ कप इडली रवा
१/२ कप गूळ
१ कप पाणी (टीप)
२ चमचे तूप
१/२ टिस्पून वेलचीपूड
१/४ कप ओलं खोबरं
कृती:
१) तूपावर इडली रवा गुलाबीसर रंगावर भाजून घ्यावा. १ कप पाणी उकळवावे आणि भाजलेल्या रव्यात घालावे. १ वाफ काढावी.
२) वाफ काढून झाली कि त्यात नारळ, वेलचीपूड आणि गूळ घालावा व परत १-२ वेळा वाफ काढावी. थाळीला तूपाचा हात लावून घ्यावा. खांडवीचे मिश्रण थाळीत ओतून थापून घ्यावे. व वड्या पाडाव्यात.
टीप:
१) बाजारात इडली रवा वेगवेगळ्या क्वालिटीमध्ये मिळतो. कधीकधी बारीक असतो तर कधी जाडसर असतो. तेव्हा पाण्याचे प्रमाण पुढीलप्रमाणे कमी जास्त करावे.
बारीक रवा = १ भाग रवा : २ भाग पाणी
जाड रवा = १ भाग रवा : अडीचपट पाणी
Labels:
Idli Rava Khandvi, Khandvi recipe, Khandavi
Other Related Recipes
उपवासाची खांडवीची
Idli Rava Khandvi
Idli Rava Khandavi in Marathi
Ingredients:
1/2 cup Idli Rava
1/2 cup Jaggery, grated
1 cup Water
2 tbsp Ghee
1/2 tsp Cardamom Powder
1/4 cup Fresh Coconut, grated
Enjoy Khandvi during Fast
Method:
1) In a nonstick pan, heat Ghee over medium heat and roast Idli Rava till color turns Pink. Boil 1 cup water in other pan and pour it in roasted Rava. Stir nicely and remove lumps with spatula, if any. Turn the heat over medium low. Cover the pan with lid and let it cook for couple of minutes.
2) After 2-3 minutes, add grated coconut, Cardamom Powder and Jaggery. stir nicely. Cover again and let it cook for 3 to 4 minutes.Mix well and remove all the lumps. Turn the heat on medium. Cover the pan with lid and let it cook for few minutes.
3) Grease a stainless steel plate with little ghee. Pour all the mixture in the plate and spread evenly to make 2 cm layer. Sprinkle grated coconut on it and Cut into 2 inch pieces.
Note:
1) In grocery stores, there are various Idli Rava brands available with different quality. Some has fine granules, some has little bigger granules. To make the perfect consistency Khandvi Mixture, Use water in the following proportion.
Rava with Fine Granules = 1 Portion Rava : 2 Portions Water
Rava with bigger Granules = 1 portion Rava : 2 1/2 Portions Water
Labels:
Desserts Recipes,
English,
F to J,
Maharashtrian Recipes,
Sweets Recipes
Wednesday, January 7, 2009
Saddington & Baynes Photo Re-Touching
Labels:
Photo,
photography,
Plane,
Retouching,
Saddington and Baynes
Daily Dose of Imagery - Ring and the rope
[daily dose of imagery] ring and the rope
Technorati Tags: Daily Dose of Imagery, Ring, Rope, Photography
Tuesday, January 6, 2009
मेथी थेपला - Methi Thepla
Methi Thepla in English
वाढणी: ४ ते ५ (५ ते ६ इंचाचे)
साहित्य:
१ कप बारीक चिरलेली मेथी
१/२ कप कणिक
२ टेस्पून दही
१/२ टिस्पून जिरे
१/४ टिस्पून ओवा
१ टिस्पून जिरेपूड
१/४ टिस्पून हळद
१/२ टिस्पून लाल तिखट
२-३ हिरव्या मिरच्या, बारीक चिरून
थोडेसे तेल
चवीपुरते मिठ
कृती:
१) एका भांड्यात चिरलेली मेथी आणि साधारण १/२ टिस्पून मिठ घालून किंचीत कुस्करून घ्यावी. १५-२० मिनीटे झाकून ठेवावे. थोड्यावेळात मेथीला किंचीत पाणी सुटेल.
२) मेथीमध्ये जिरे, ओवा, जिरेपूड, हळद, लाल तिखट, हिरव्या मिरच्या घालावे आणि मिक्स करावे. कणिक, किंचीत मिठ आणि दही घालून मळून घ्यावे. अजून दही लागणार नाही पण जर पिठ घट्ट झाले तर किंचीत दही घालून मळावे, पाणी वापरू नये. मळलेले पिठ १/२ तास झाकून ठेवावे.
३) १/२ तासाने पिठ एकदा परत मळून घ्यावे आणि ४ ते ५ गोळे करून घ्यावे. तवा गरम करावा. पोळ्या करतो तसे लाटून घ्यावे. थोडे तेल घालून दोन्ही बाजू निट भाजून घ्याव्यात.
गरम गरम थेपला चटणीबरोबर सर्व्ह करावा.
Labels:
Methi Thepla, Fenugreek Roti, Fenugreek Thepla
Sam Bassett Photography
Methi Thepla
Methi Thepla in Marathi
Ingredients:
1 cup finely chopped Fenugreek Leaves
1/2 cup Wheat Flour
2 tbsp plain Yogurt
1/2 tsp Cumin seeds
1/4 tsp Carom Seeds
1 tsp Cumin Powder
1/4 tsp Turmeric Powder
1/2 tsp Red Chili Powder
2 to 3 Green Chilies, finely chopped
1 tsp Oil
salt to taste
Method:
1) In a mixing bowl, add chopped Methi leaves and 1/2 tsp salt. smash with hands for about a minute. Cover the bowl and rest aside for 15 minutes. Crumbling Methi leaves with some salt will make Methi leaves little mushy and watery. Therefore you wont need to add more water while kneading dough.
2) Add Cumin seeds, Carom Seeds, Cumin powder, Turmeric, Red CHili powder and green chilies to mashed Methi leaves. Now mix well. Add yogurt and salt to taste. Add Wheat flour spoonful at a time. Incorporate all wheat flour, knead nicely and make a dough. If the dough is little dry, add 1 tbsp Yogurt and knead. Do not add water to make the dough little moist.
Put this dough in a greased bowl and cover with damp cloth or any plate to avoid drying for about 1/2 an hour.
3) After 1/2 an hour, knead the dough well and make 4 to 5 equal balls. heat a griddle or Tawa. Roll the dough balls into thin and flat round disc. Cook each Thepla over hot Tawa. Apply some oil and roast both sides of Thepla.
Serve hot with Green Chutney or Garlic Spicy Chutney
Labels:
Methi Thepla, Fenugreek Paratha
Monday, January 5, 2009
Romain Laurent - Photographer
Technorati Tags: Romain Laurent, Photography, Photogapher, Jeans, Editorial
Labels:
Editorial,
Jeans,
Photogapher,
photography,
Romain Laurent
Subscribe to:
Posts (Atom)